Support Installation Document
Customer Support
We're here to help! Contact B3 Technology PLT for customer or technical support. Reach us by phone or email.
B3 Cafe Server System
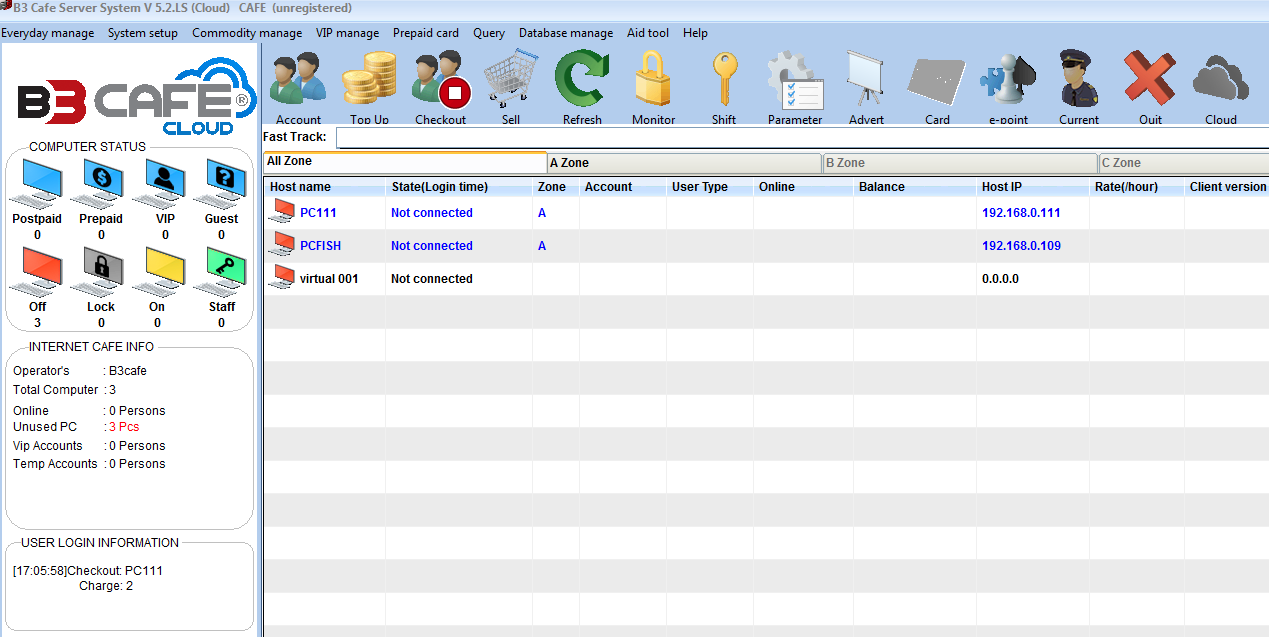
1 )B3 Cafe Server System Installation & Uninstallation
B3 Café Server System – How to install and try out
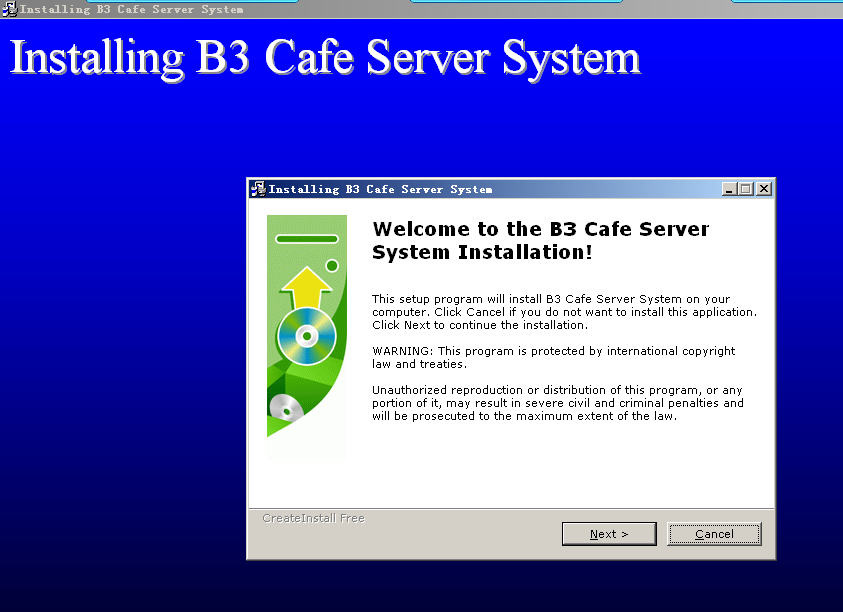
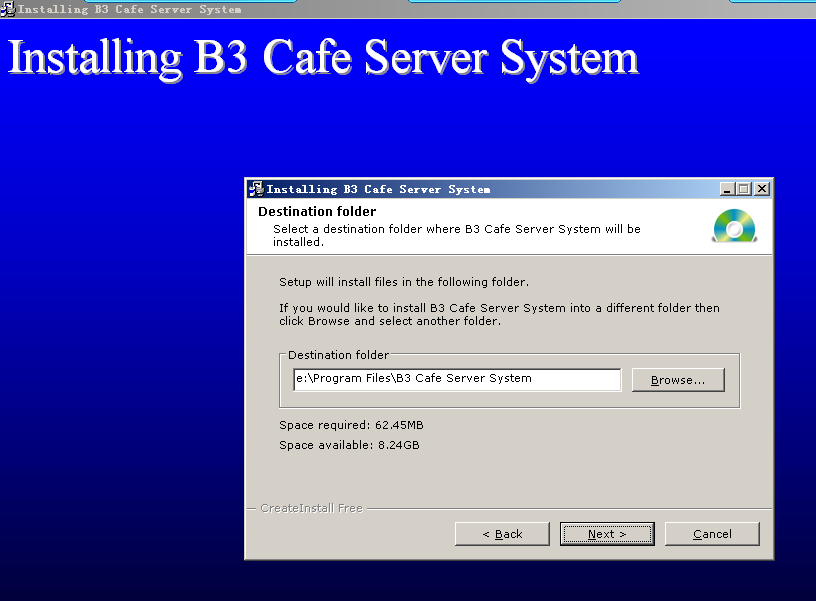
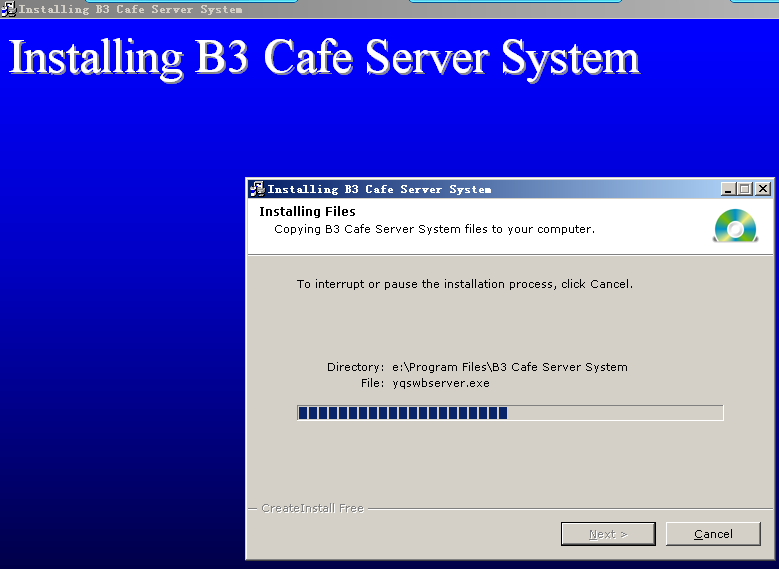
B3 Café Server System – Detailed instructions of server program installation
Double-click B3 Café Server System server software.exe installation program. The server installation program will start. As shown in the picture, double-click as below:
Click the ‘next’ button to continue the installation
At this step, you can click on ‘browse’ button to search for the installation directory. However, it is best recommended to directly click on the ‘next’ button to carry out the installation.
Install the program in the default directory for easier future updates.
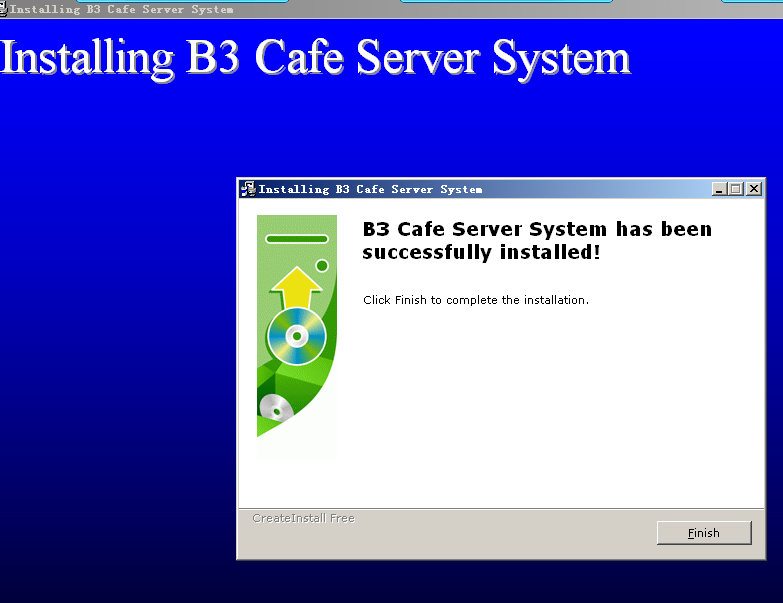
Click on ‘next’ button to continue installation
Click on ‘finish’ button to complete the installation.
B3 Café Client System, client management program installation detailed instructions.
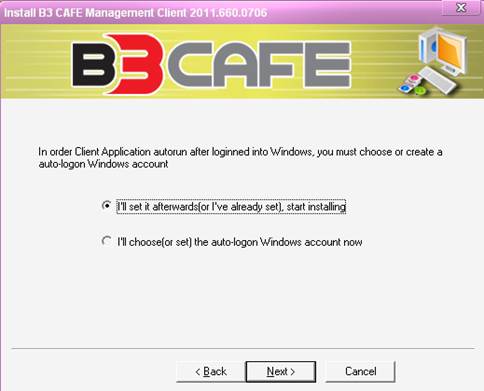
Double-click B3 Café Server System client management software.exe installation program. The client management installation program will start as follows:
Just click on the ‘next’ button
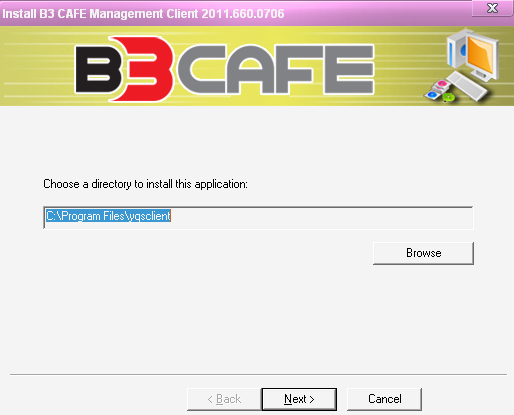
Follow the ‘default directory’ and click ‘next’ button
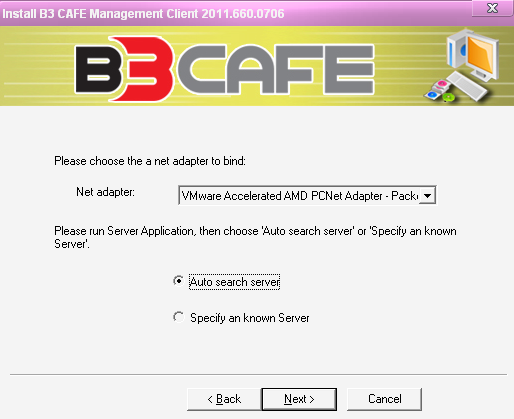
Auto search. Continue to click on ‘next’ button.
Continue clicking. Click on ‘next’ button
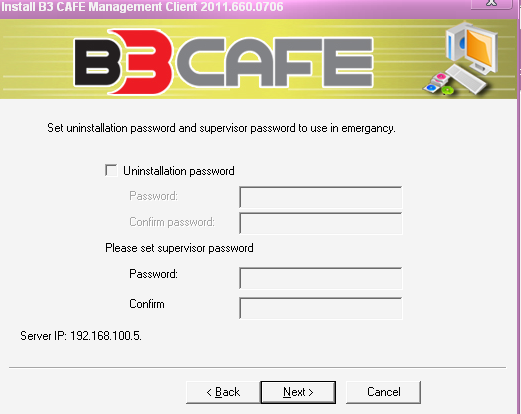
According to your needs, you can choose to set the uninstallation password and supervisor passwords, click on ‘next’ button.
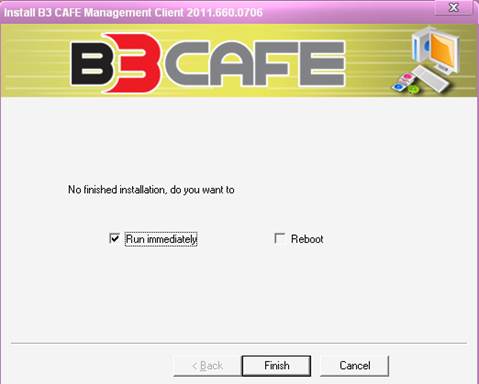
Until the installation is done. Click on the ‘finish’ button to complete the installation
2) Software Function Description
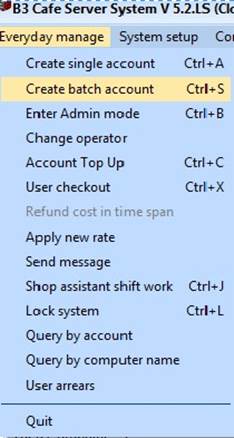
1 Daily Management
- Create single account
For the online customers to generate account, click on ‘Everyday manage’ in the server software – create a single account, or directly click ‘create account’, to open the following window:
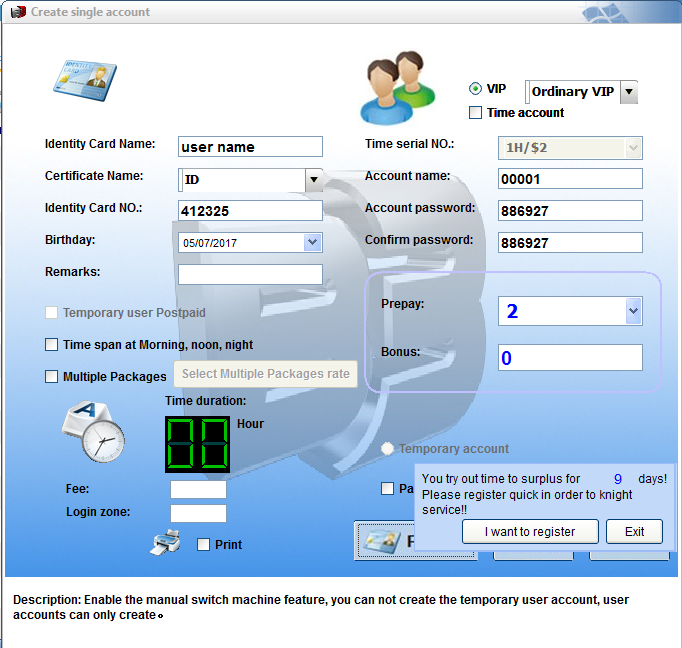
If the internet café uses manual switch machine feature to access daily management function, temporary user account cannot be created, only user account can be created. (Note: To enable/disable manual switch machine feature, kindly access ‘system setup’ – followed by ‘parameter setup’)
Key in your username, identity card number, prepay credits, bonus credits (If the internet café do not have any credits reward promotions available, kindly ignore this column), user information (contact number etc., can choose not to fill in), if there is any available ticket printer to be connected, click on ‘create’ button to complete the user account registration.
- Create batch account
Click ‘Everyday manage’ – ‘create batch account’, to open the following window:
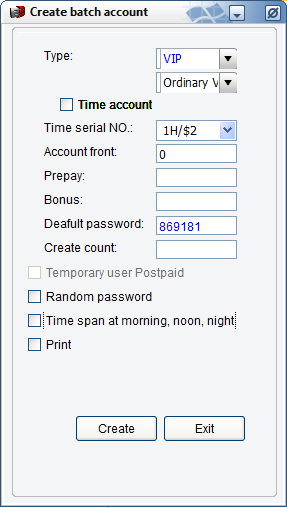
Firstly, select the ‘temporary account’ or the ‘VIP account’, and enter all the user account available credits in the ‘prepay’ column, enter the correct password at ‘default password’ column, and enter the number of accounts to be created in the ‘create count’ column, and finally click ‘create’ button, and a prompt message will notify that accounts had successfully created.
Note: if the accounts created are temporary account, the account number begins with letters ‘pt’, such as pt001, pt002…; if the accounts created are VIP account, the account number begins with letters ‘hy’, such as hy001, hy002…
- Boss Mode
Click ‘everyday manage’ and select Admin mode. Enter the Administrator’s user name and password at the Admin and password pop-up window (refer below), click ‘confirm’ button to enter the boss mode.
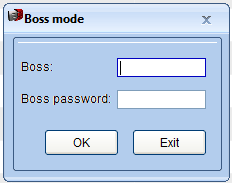
After entering the Admin mode, the bottom left corner of the program will display ‘Admin Mode’.
Now we can easily operate the management functions. Once we finished using the management function, we should exit from Admin mode. This can be done by clicking ‘Everyday manage’ and select quit admin mode. Now we can see the bottom left corner of the program will display ‘operator code ***’
After quitting the Admin mode, it will then restore to operator code.
- Change Operator
Open the server system, select ‘Everyday manage’ -> ‘Change operator’ and a window will pop-up as shown below:
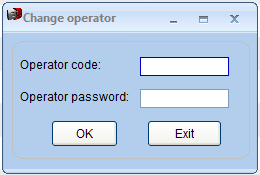
Enter the operator code and operator password, then click ‘ok’ to change the operator. The bottom right corner of the program will then display the current operator information.
1.5 Account Top up
The internet café is required to use this feature to top up the users account, by clicking ‘account top up’ at the server program main window, to open the window as shown below:
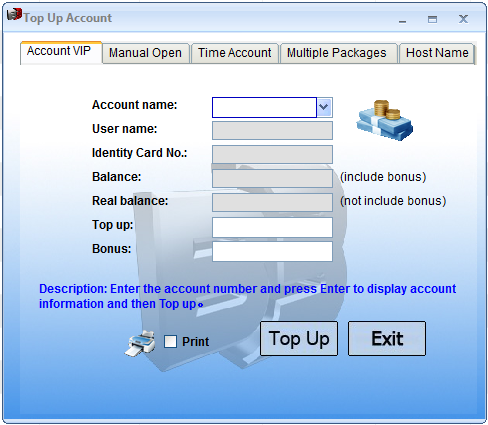
- Account top up
This function is used to top up VIP account and temporary account, at the ‘Account name’ select the legitimate account that required to top up, and hit the enter button at your keyboard, and it will display the account information, included: user name, identity card number, balance, enter the top up amount at the ‘Top up’ column, if the internet café has top up promotional activities, can enter the bonus top up amount available, followed by clicking ‘top up’ button for complete the top up process.
- Manual Switch top up
This function allows the customers to manually top up their account, after selected will show the window as below:
Select the customer’s computer name that needed to top up, and enter the top up amount, then click ‘top up’ to complete the top up process.
- Batch account top up
Refers below:

Select the account type that you would like to top up: VIP account or temporary account
After that, click ‘top up’ to finish the top up process for the selected account.
- Check out
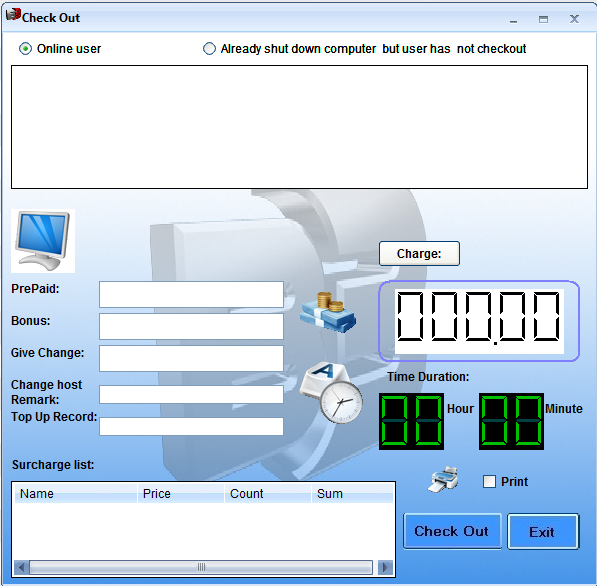
Select the check out pc unit, right click on your mouse, at the pop-up shortcut menu, select ‘check out’ or you can also click on ‘check out’ button on the upper left corner on the server program, as shown in the picture:
Select the temporary account to checkout or enter the temporary account that required to check out, click ‘check out statement’ to display the user pc usage details, click ‘check out charges’ to complete check out process. Press Ctrl to select multiple accounts, and you can enable multiple accounts at the same time.
- User refund in time span
Run the server system, click ‘system setup’, - ‘parameter setup’, to open below window:
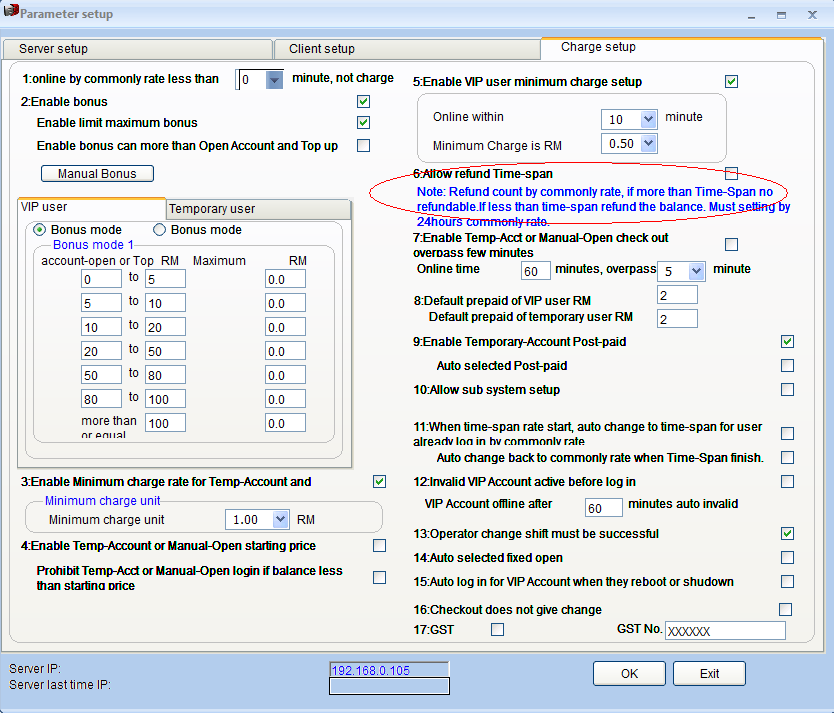
After that, click ‘OK’ and select ‘everyday manage’ – ‘user refund in time span’ to open the below window:
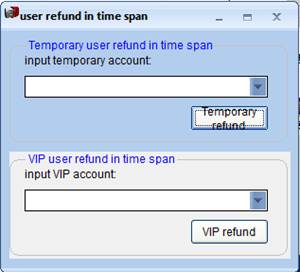
Enter the user account that would like to refund, click on refund to finish the process.
1.8 Apply new rate
At the server program, click on ‘everyday manage’ – Apply new rate
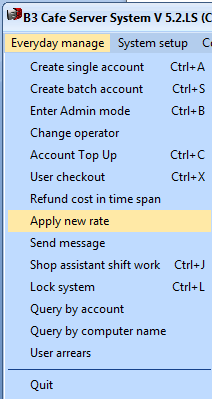
The pop-up window below will shown:
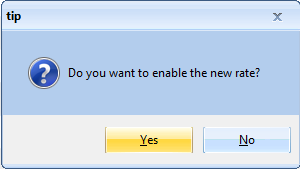
Click ‘yes’ to finish applying new rates.
1.9 Send message
Enter B3 CAFÉ Server System, under the Everyday manage dropdown menu and select send message, or
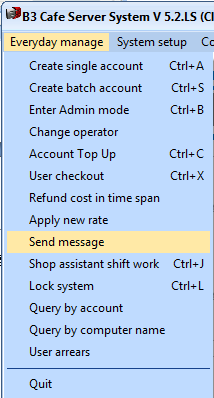
access the customers’ pc list to select any customer, right click on the mouse, and select the send message option from the pop-up menu.
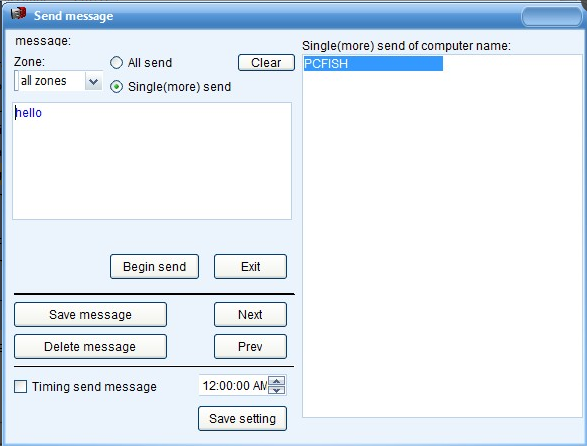
The message settings will pop-up, and you can now configure the settings and send messages to the customer.

In the send message page, you can choose to send the messages to all the pc units. You can also set the time duration on how frequent the messages will be sent, and how any times the messages will be sent. After sending the messages, at the bottom corner you can click on ‘previous’ or ‘next’ to read all the message history. You can also choose to send messages to a single pc unit.

The customer’s pc message notification will be displayed on the bottom right corner of the screen.
1.10 Shop assistant shift work
Whenever the internet café required to switch the shop assistant, click on ‘everyday manage’ – ‘shop assistant shift work’ to open the below window:
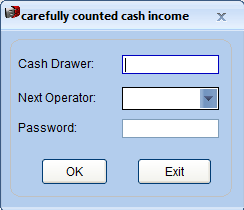
Enter the accurate amount of cash drawer income, then click ‘ok’ to open the following window:

The above shown the sales record of the current shift shop assistant, enter the replacement shift shop assistant code and password at below and click ‘OK’.
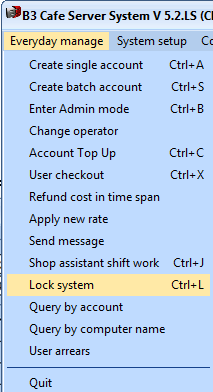
1.11 Lock System
Enter the server system, under the everyday manage dropdown menu and select lock system option:
After clicking, a message prompt will appear as shown:
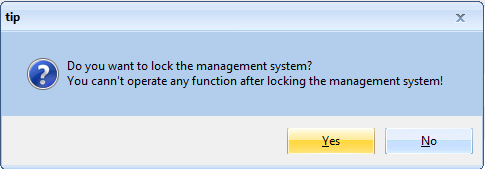
After you confirmed to lock the system, kindly click ‘yes’
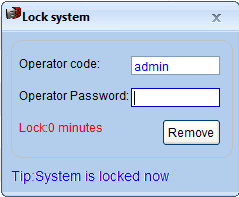
The system will be locked after clicking. A remove lock system window will then appeared on the server main page. The server system is successfully locked at the moment.
1.2 Floating Window display
The floating window is a default setting, as shown below:
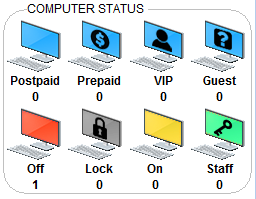
The floating window will display the current customers’ computer status. The server system can stay minimized but still able to check on the customer computer status.
The floating window colors indicate as below:
Red light: indicates that the customer’s pc is not turned on, and is not connected to the server. In the server system, it will show as ‘not connected’
Yellow light: indicates that the customer’s pc is turned on, and is connected to the server. In the server system, it will show as ‘connected’
Green light: indicates that the customer’s pc is turned on and the customer is using the pc.
Blue light : indicates that the customer’s pc is logged out
Green light with question mark: indicates that the customer’s pc is turned on, the server system is billing normally, but the pc is currently being turned off or restarted.
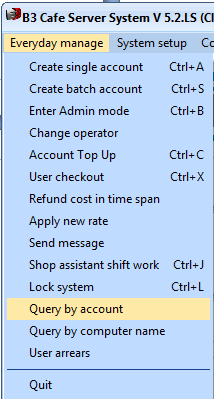
1.13 Query by computer name
When accessing the server system, click ‘everyday manage’ – ‘query by computer name’, and open the below window:
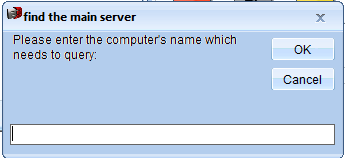
Enter the computer’s name that need to query and click ‘ok’.
1.14 Query by account
When accessing the server system, click ‘everyday manage’ – ‘query by account’, and open the below window:
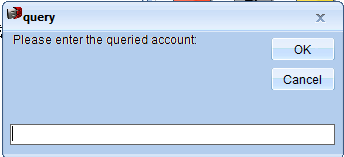
Enter the account number that need to query and click ‘ok’.
1.15 Single Manual Open computer
Single manual open computer: When using manual reboot, right click on the fixed open option
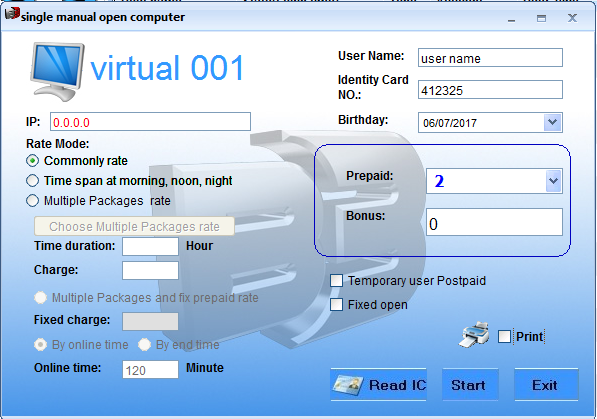
If selected, the user billing will start from the moment the customer’s pc is turned on (including the moment of turning off the pc), the server will indicates a green light with question mark icon.

If not selected, the user billing will start from the moment the customer log in to their account, if the customer pc is in the shutting down state (server indicates yellow light), the server will stop billing until the user log back in the account only will start billing.
1.6 User Arrears
In the server system everyday manage dropdown menu---user arrears:
Click it to open the below window:
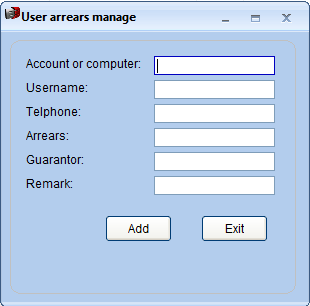
Fill in all the corresponding details to store the complete information. Then, it can be searched through the database – user arrears record to search for the respective details.
1.17 Quit System
Accessing the server system, click ‘ Everyday manage’ – ‘Quit’, to open the window as below:

Shut down client: indicates shut down the server system
Do not shut down client: indicates do not shut down the server system
Click ‘Ok’ to quit the system.
- System Setup
- Operator Setup
Default operator code: admin Default operator password: admin
Once used admin to log into the server system, click ‘system setup’ – ‘operator setup’, to open the window as below:
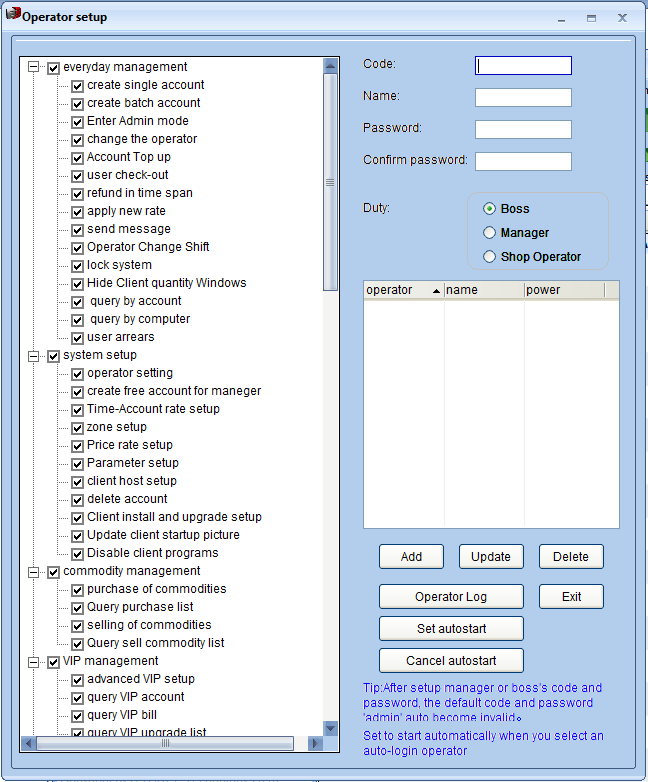
1) Add Operator/Manager:
Enter the manager/shop operator/boss log in code in the ‘Code’ column, Example: 001, 002 etc. enter the shop operator/manager/boss’s real name in the ‘Name’ column, enter the respective password in the ‘password’ column, enter the same password in the ‘confirm password’ column, pick the duty between shop operator/manager/boss, and click on ‘add’ , the right hand side list will then show all the details of the added operator, thus can enter the new code and password next time to log in the server system. The respective access permission of operator/manager/and boss can be set at the right hand side setup page.
Note: Once the new code is generated, the default code: admin will no longer be valid.
2) Update/Delete Code Information:
Select the code information at right hand side of setup page, double click the ‘update’, ‘delete’ button below, to proceed with the editing process.
2.2 Create free account
Default operator code: admin Default Operator password: admin
After using the admin to access the server system, click ‘system setup’ – ‘operator setup’, to open the window as below:
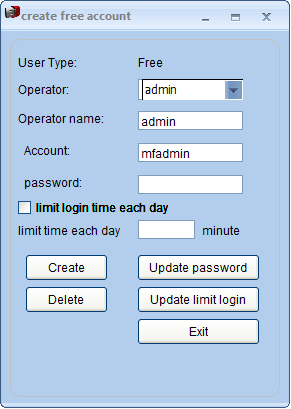
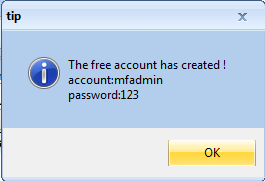
In this setting page, it is only require to enter the free account password to create the free account.
Click on the system setup – time account rate setup as below:
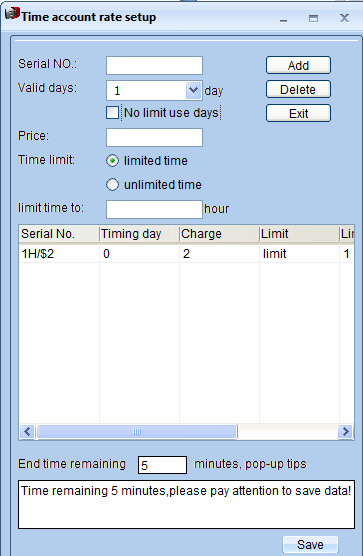
According to your needs to set the package time Serial No, package time price, and the time limit, and then click save to finish the setup.
2.4 Zone Setup
Access B3 Café Server System, click ‘system setup’ – ‘Zone setup’, to open below window:
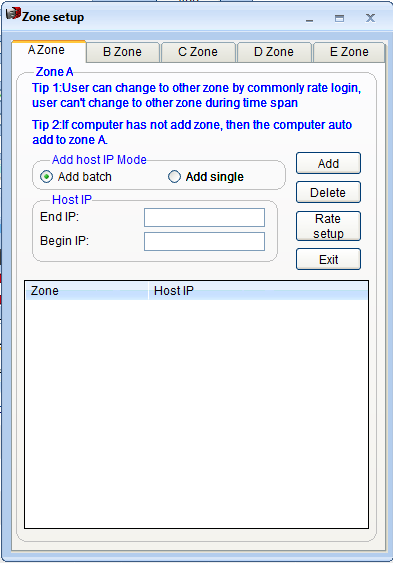
First, select the zone to be added (Zone A, Zone B Zone C, Zone D, Zone E)
Add batch pc:
Enter the begin and end IP, followed by clicking ‘add’ , example: enter IP: 192.168.0.10 , End IP 192.168.0.50, then after clicking ‘add’, at the bottom list will then show all the computer host IP from 192.168.0.10 to192.168.0.50.
Add single pc:
At the single pc IP column, enter the host IP of the single pc to be added, and click ‘add’ button, the bottom list will then show all the host IP that had been added.
Secondly, set a rate for the pc units that had been added into the zone.
After all the PCs is added, click ‘rate setup’ button to enter the rate setup window as shown below:
If you think the default rate is good and no need to be changed, direct click on ‘apply new rate’ button will do. If required to change, the time and the rate can be updated.
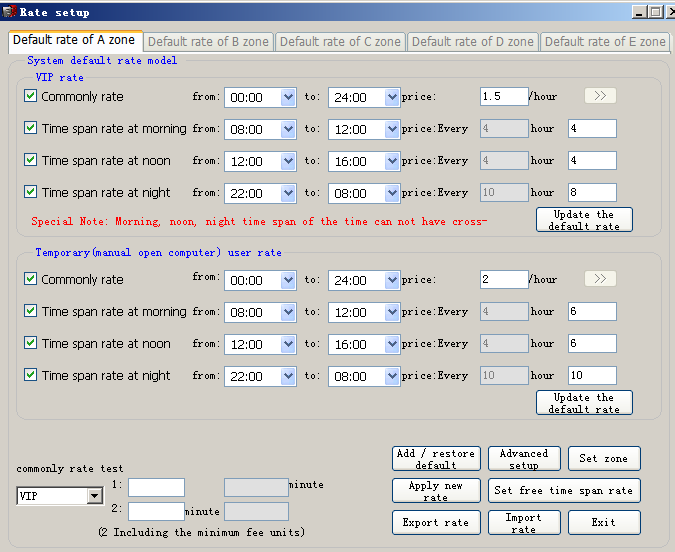
2.5 Price rate setup
Access the system server, click ‘system setup’ – ‘price rate setup’ to open the following window:
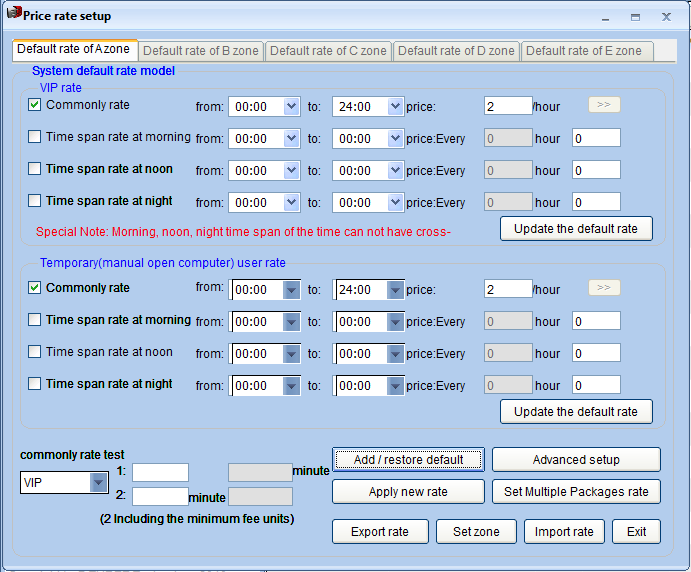
According to the needs, choose the rate to be set, update the time duration and price, after finish updated, click ‘update the default rate’ then click ‘apply new rate’.
After updating the price rate, ‘apply new rate’ button must be clicked in order to take effect.
After clicked, it will then become the new price rate for the server system.
Click, to set a more detailed and flexible price rate, as below:
For more details, kindly refer to ‘zone setup’ function descriptions.
2.6 Parameter setup
Access the server system, click ‘system setup’ – ‘parameter setup’
2.7 Client Host Setup
Click ‘system setup’ - ‘client host setup’, to open the below window:
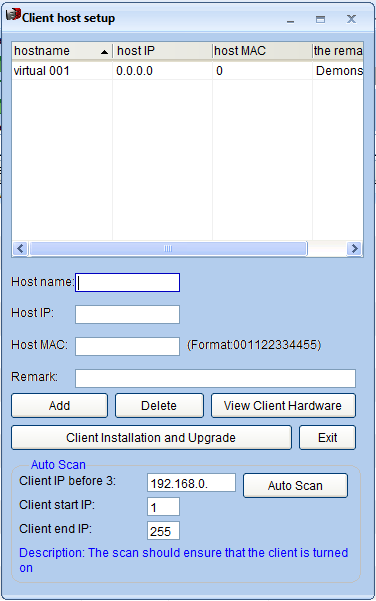
- Adding client host manually:
At the ‘Host name’ column, enter the client host name to be added, at ‘Host IP’, enter the client host IP, then click ‘add’ to complete the client host setup. (Note: Generally it is not require to manually add client host, because once the server system software is installed on the customer’s pc, it will be automatically added.)
- Delete client host:
Select the host name displayed on above list and left click on the mouse, followed by clicking ‘delete’ button to complete the deletion. After deleted, all the deleted host name will then be removed from the client host setup list.
- If do not want to manually add client host, you can set the IP at bottom column, and the software will then perform auto scan, at the detected host IP will then be automatically added into the list.
2.8 Account Cancellation
Click ‘system setup’ – ‘delete and disable account’, an access limit window will pop up requesting to enter the operator code and password (default: admin), as below:

If I wish to delete an account: yt0023, I will then fill up the ‘start account’ and ‘end account’ by entering the account number yt0023, and click the ‘delete’ button; For deleting a batch of account, example: from pt0010~pt0021, kindly enter pt0010 at the ‘start account’ column, and enter pt0021 at the ‘end account’ column, and click ‘delete’; If you would like to delete account from a certain time duration, select ‘by account-open time’ and choose your desired time start and time end, then proceed with clicking ‘delete’ button;
If you would like to delete an account with credit balance of 0, select ‘account balance – 0’ and click ‘delete’ button; Besides that, you can also choose which account type is to be deleted, which are temporary account and VIP account respectively, followed by clicking the ‘delete’ button. When all the temporary account had been deleted, the newly created temporary account number will start from 1, default as pt0001….
2.9 Client Install and Upgrades
Access the B3 Café Server System, select system setup to view the dropdown list. From there, select the client install and upgrades option.
- Upgrade client
When log into the client upgrades page for the first time, the list window will display all of your shared folders in the server. If you have not any shared folder stored on the server, the list will be empty.

Since we are going to upgrade the client from the server, the server should provide all the upgrade files for the client to use. That is why we have created a shared folder on the server and set the permission to allow customers to have full access to the files. Then, copy all the client programs that wished to be upgraded into this shared folder.
After setting up the shared files, we will then select the client upgrade setting via the server. At this point, we will see the newly shared folder that had just been created. Click on the shared folder. In the pop-up shared folder, select the files to be upgraded.
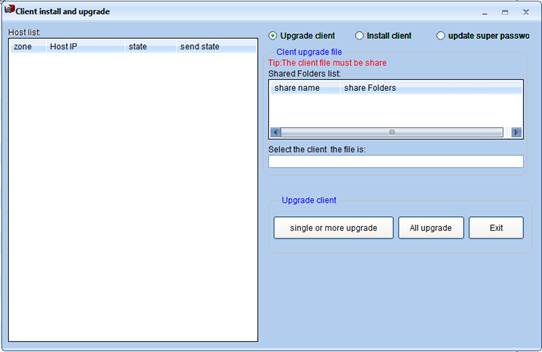
The upgrade files will then be displayed at the upgrade window. Now we can proceed to upgrade the client. If currently there is no user is using the computers, you can click on ‘all upgrade’. If you wish to upgrade a certain unit of pc, you can then select the said pc, and click ‘single or more upgrade’, and the client will automatically upgrades.
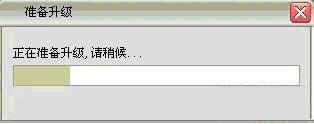
When the client is upgrading, the screen will be as shown below:
If there is any files cannot be accessed during the upgrading process, the upgrade will fail. Kindly restart the pc and resume the upgrading process, or manually upgrade the client.
- Install Client
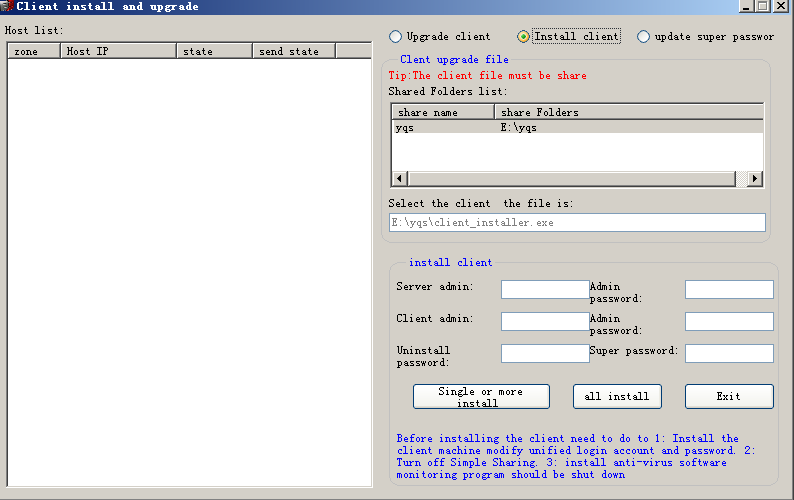
This is similar to client upgrade, because the install files must be stored in the share folders,
Server admin and admin password: the username and password of the pc operating system where the server software is located.
Client admin and admin password: the client’s operating system username and password.
Fill in the uninstall password and super password. For single installation, please select the IP and click ‘single or more install’, If you wish to install all, then click on ‘all install’.
- Update client start-up and lock screen pictures
- Access B3 Café Server System, click ‘system setup’ – ‘Update client start-up and lock screen pictures’, to open below window:
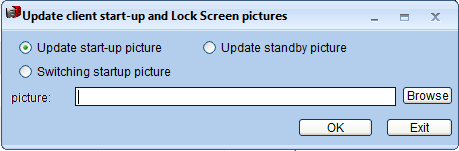
Select the picture to be set as start-up picture, click ‘ok’. Note: To have a better display quality, it is recommended to set the picture size as 1024x768, set the color to 256, currently supports bmp, gif, and jpg three picture formats.
2.11 Disable and close the client program
Access B3 Café Server System, click ‘system setup’ – ‘disable and close client program’ to open below window:
- Prohibit the client to run some program after successfully log in
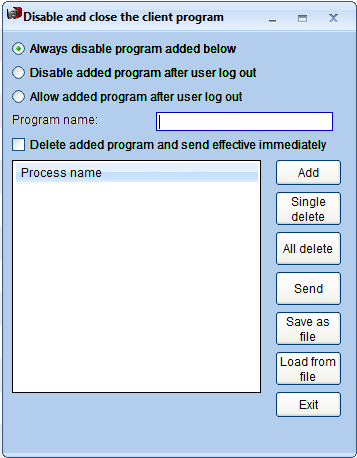
Enter the program name to be prohibited, and click ‘add’. If wishes to delete, select the program name to be deleted, and click ‘delete’. If you want to apply the settings to the client, select the pc you would like to send , and click ‘send’.
- Disable certain programs after client log out.
Enter the program name to be prohibited, and click ‘add’. If wishes to delete, select the program name to be deleted, and click ‘delete’. If you want to apply the settings to the client, select the pc you would like to send, and click ‘send’.
3 Commodity Manage
3.1 Commodity purchase
Commodity Manage -> Purchase
To add the commodity, enter the commodity information, and click ‘add’
To add existing commodity, select the existing commodity to be added, set the number of commodity and price, and click ‘add’ will do.
To add new commodity, enter the commodity name, price, numbers, and click ‘add’
If you wish to delete the commodity, select the respective commodity and click ‘delete’
3.2 Query Purchase list
Commodity manage -> Query Purchase list
Click ‘query purchase record’ , (condition) select the name of the commodity, (value) Enter the respective operator code, (Time Start) select the date and also can select the commodity, (Value) Enter the respective commodity name.
3.3 Sell commodity function
Commodity manage ->Sell commodity
Click on sell commodity
Selected the commodity -> double click The commodities to be sold will be displayed at the stock list.
Click ‘sell’
Sold successfully
3.4 Sell commodity list
Commodity manage -> Sell commodity list
Click ‘sell commodity list , (condition) select the name of the commodity, (value) Enter the respective operator code, (Time Start) select the date and also can select the commodity, (Value) Enter the respective commodity name.
4 VIP Management
4.1 Advanced VIP set up
VIP manage -> Advanced VIP set up
Click on Advanced VIP set up
According to your own preferences, to decide whether to provide advanced VIP settings
Set up membership points, upgrades points and bonuses.
Click ‘OK’
To upgrade the VIP, click on ‘VIP Upgrade’
Click ‘Yes’
Click ‘Yes’, and the VIP upgrade is successful
4.2 Query VIP Account
VIP manage-> Query VIP Account
Select (Item), enter the corresponding query value. The following dropdown list is the account numbers, at the value column kindly enter your desire account number to search for the respective account, then on the left will display the details of the VIP account, as shown below:
选择(项目),输入相应的查询值。下面选的是账号,然后在查询值输入要查询的账号,选中查询到的会员帐号,在左边即可显示该会员帐号的详细信息,如图:
You can also modify on the query date, to filter and search for the specific time period account.
Once selected the account, right-click on mouse can check and edit on user account information, you can also disable, delete account, and use the mouse to drag and select multiple accounts, right click to select and enable multiple accounts.
Click on print to print out the account details.
4.3 Query VIP Bill
VIP manage –> Query VIP Bill
Select the correct item, the selection is (account), and then enter the corresponding query value, hereby enter the account number (1)
Click ‘query’, to check on VIP’s bill
Click ‘print’ to print out the bill
4.4 Query VIP upgrade level
Select the correct item, the selection is (operator code), and then enter the corresponding query value (operator code (admin), hereby select the query date
Click ‘query’, to search for VIP upgrade record
4.5 Query Time account
VIP Manage -> Query Time account
Select the correct item, the selection is (account nnumber), and then enter the corresponding query value, hereby enter the account number (hy003)
Click ‘Query’
4.6 VIP Account transfer
Default operator code: admin Default operator password: admin
After used admin to access management system, click on ‘VIP Manage’ – ‘VIP Account transfer’, and open below window:
Enter the sender account number, recipient account number, transfer amount, and click transfer, and the following message prompt will appear:
Click ‘Yes’ to continue transfer, click ‘No’ to quit.
4.7 VIP Transfer Credit Record
Default operator code: admin Default operator password: admin
After used admin to access management system, click’ VIP manage’ – ‘VIP Transfer Credit Record’, and open the below window:
Select the correct item, the selection is (sender account), and then enter the corresponding query value, hereby enter the sender account number (hy001), and click query.
5 Prepaid Card
5.1 Create prepaid card
Click ‘Create prepaid card’, and the following window will appear, as such:
At ‘Start No’, kindly enter the begin letters for your desired card number, such as ‘s’, and at ‘No Digit’ choose the number of digits you would like to generate with your prepaid card, such as 10 digits. According to the actual situation of the internet café, enter the amount you would like to generate at the ‘Card Value’ , example, RM20, and then enter your desired selling price at ‘Selling Price’, example RM18, and finally fill in the ‘Create Quantity’ for the quantity of prepaid cards to be generated, then click ‘Create’. If you are connected to a printer, select the prepaid card number to be printed, then print out the prepaid card. At this time, a message prompt will appear to notify ‘The prepaid Card created successfully’, as below:
At this moment you can check on the generated prepaid card details, click on ‘query’ button, and the query prepaid card window will appear, as below:
From the window, you can check on the detailed information of the generated prepaid cards.
5.2 Sell prepaid card
At the prepaid card menu, select ‘Sell prepaid card’, and the following window will pop-up:
Select the prepaid card to be sold from the window, at the window bottom left corner will display the relevant details of the prepaid card, then click ‘Sell’
Then, the following window will appear to notify that the top up card sold successfully.
If you would like to continue selling the prepaid card, kindly repeat the above steps.
5.3 Return prepaid card
Click on the prepaid card menu, select ‘ Return prepaid card’, and the following Return prepaid card window will appear, as such:
The above window will display all the prepaid cards sold that have not been used yet (Note: Prepaid card that had been used is not returnable), select the prepaid card to be return from the list, at the bottom left corner of the window, key in all the prepaid card respective details, and click ‘Return’ button, and a window prompt will appear to notify ‘Prepaid card refund successfully’ as below:
If you wished to return more prepaid card, kindly repeat the above steps.
5.4 Query prepaid card
Prepaid card -> Query prepaid card
Select the correct item, the selection is (account number), and then enter the corresponding query value, hereby enter the account number (1)
Click on Query, thus can check on the selected prepaid card details
5.5 Query sell and return list
Select the correct item, the selection is (account number), and then enter the corresponding query value, hereby enter the account number (1)
Click on Query, thus can check on the sell and return prepaid card details
5.6 Query prepaid card use list
Prepaid card -> Query prepaid card use list
Select the correct item, the selection is (account number), and then enter the corresponding query value, hereby enter the account number (1)
Click on Query, thus can check on the prepaid card used list details
6 Query
6.1 Query
To check on the internet café daily operation status, kindly open ‘Query everyday charge’ function, the open method: ‘Query’ – ‘Query everyday charge’, and open the following window as below:
The related information will be shown as below picture:
At the ‘operator’ column, can select the current operator code on duty, and query from the time start to time end, this can be changed according to internet café specific needs, and finally click on query (the default shows the sales record of the operator at the present day)
Click on the send email setup option to determine whether to send mail etc.
According on your own needs on whether to set email or not.
6.2 Sales Analysis
Refer to the internet café sales analysis : Query -> Sales analysis
Can query by using the following data (day, week, month)
6.3 Account advanced query
Account query: Query -> Account advanced query
Select the item and enter the appropriate query value. The following selection is the operator code, enter the appropriate operator code in the query value, select the corresponding date and account, and on then left will display the details of the selected account, as shown below:
Click on query to check on the selected account, select the account number, and right-click on the mouse to apply updates to the account:
6.4 Bill advanced query
Bill advanced query: Query -> Bill advanced query
Click on Bill advanced query, select the item, (the selection here is the account number), and then enter the query value (enter the account number here 1), select the query time period.
Click query to check on the user bill
6.5 Query Top up list
Query top up list : Query -> Query top up list
Select condition, (select the account number), enter the query value (enter the account number here 1), then select the query time period.
Click on query, to check on the top up status
6.6 Query decimal charge
Query -> Query Decimal charge
Select condition, (select the account number), enter the query value (enter the account number here 1), then select the query time period.
Then click query.
6.7 Query temporary account refund
Query -> Query temp-acct give change
Select condition, (select the account number), enter the query value (enter the account number here 1), then select the query time period.
Then, click on query
6.8 Query change shift record
Query -> Query change shift record
Select the operator code, (the selection here is admin), then select the query time duration
Then click on query
6.9 Query user arrears list
Query -> Query user arrears list
Select condition, (select the account number), enter the query value (enter the account number here 1), then select the query time period.
Click on query to check on the user arrears record
6.10 Query Surcharge
Query -> Query surcharge
Select condition, (select the account number), enter the query value (enter the account number here 1), then select the query time period.
Then click query.
6.11 Current Sales Report
Query -> Current Sales report
7 Database manage
7.1 Backup database at once
Access B3 Café Server System, select Database manage, and pick backup database at once from the dropdown list.
Then, click backup
If currently all the users are offline, click on ‘Yes’ to proceed with the backup process, and a message prompt will appear to notify backup database successfully
7.2 Timing backup database
Access the server system. Click on database manage, then select timing backup database from the dropdown list.
In this setup page, we can set the time interval on how long to backup once or what time to backup every day. You can also set the backup destination folder. After finish set up, then click ok to confirm the settings. In the pop-up confirmation window, click ok to apply the changes.
7.3 Restore database
Access the server system, click on database manage, then select restore database from the dropdown list.
At the pop-up window, we can choose to select whether only restore the account details data or all the database.
After selected the file to be restored, then click restore to begin restoring process.
Once the database had been successfully restored, a message prompt will notify database restored successfully
The below window will pop-up as such:
After edit, then click ‘update’
After the setting, whenever we start generating new account, the member account number will starts with the specified alphabet, such as: the above set of newly generated account number will start from 00009.
7.4 Clear and repair database
Default operator code: admin Default operator password admin
After used admin to access the management system, can click ‘manage database’ – ‘Clear and repair database’, to open the following window:
When entering this page, click compress. Once the message prompt box appear, click confirm again.
Once confirmed, the database will start to compress, and a message prompt will appear when the compression is done.
8 Shortcut Menu
8.1 Manual reboot
Once opened the server system, right-click on the mouse – single manual open computer, as such:
Enter the amount charged, then press ‘start’.
Enter the amount charged, then press ‘start’.
8.2 Manual Top up
Access the server system, right-click on the mouse – Manual top up, as such:
Enter the top up amount, then click ‘Top Up’.
8.3 Manual change host
Access the server system, right-click on the mouse – Manual change host, as such:
Can directly enter the pc name, or select the pc from the dropdown list, then click ‘change’
8.4 Manual Switch Host (between two host)
Access the server system, right-click on the mouse – Manual Switch Host.
Note: The two PCs that would like to exchange host must be already turned on manually.
8.5 Check Out
Select the pc to check out, right-click on the mouse, select ‘check out’ from the pop-up menu, or can access via clicking ‘check out’ button in the upper left corner screen of server system, as in below picture:
Select the temporary account to be checked out or key in the temporary account to be checked out, click ‘charge’ to display the customer’s pc online details, then click ‘check out’. Press Ctrl to select and enable multiple accounts.
8.6 Top up account
The internet café will use this feature to top up the customers’ account, directly click ‘Top up account’ on the server system main page, and open the following window:
- Top up account
This feature is used to top up the VIP Account and temporary account, select the legitimate account name, then press enter on the keyboard, it will display all the relevant details of the customer, such as: user name, identity card number, balance, etc, then enter the top up amount, and also enter the bonus amount if there is any promotional top up activities available, then finally click ‘Top Up’.
- Manual top up
This feature is used to allow customer top up their account manually, as such:
At the account name column, kindly select the pc name of the customer that would like to top up, then enter the top up amount, and proceed to click ‘Top Up’.
- Top up batch account
Refer below picture:
Select the type of customer account that you would like to top up: VIP or temporary account
After enter all the details, then press ‘Top Up’.
8.7 Re-enable the temporary account
At the server system main page, right-click on the mouse, then select ‘Re-enable the temporary account’ from the dropdown menu, as below:
Select the temporary account that would like to be re-enabled, set the password and prepaid amount, then click ‘single or more enable’.
8.8 Client monitoring
At the server system menu, kindly select the pc unit that you would like to monitor, then right-click on the mouse, and select ‘monitoring client computer’ from the dropdown menu. If it is a genuine user, it will open a window which you can monitor the client’s desktop.
8.9 Send message
Access the B3 Café Server System, under the Everyday manage dropdown menu, kindly select ‘send message’.
Or you can also select a particular client’s pc from the pc list, right-click on the mouse, then select ‘send message’ from the pop-up menu.
After selecting ‘send message’, a pop-up message settings window will appear where you can write your message to be sent to the client.
In the message settings window, you can choose to send to all clients pc. By choosing send to all clients, you can set the time interval on how often the message to be sent to the client, and how many times the message will be sent. After finished sending the message, you can click on ‘next’ and ‘previous’ button at the bottom corner of the window to check the message history. You can also choose to send message to a single client pc.
The messages sent will be displayed on the client’s screen at bottom right corner.
8.10 Change to time span
In the server system list, select the pc that would like to change to time span, then right-click on the mouse. In the pop up menu, select ‘change to time span’, and it will pop up a confirmation box as shown below:
Click (Y), as shown below:
8.11 Shut down client pc
In the server system, kindly select the pc unit to be shut down. Then right-click on the mouse, at the pop-up menu, select ‘Shut down client pc’.
8.12 Restart client pc
In the server system, kindly select the pc unit to be restarted. Then right-click on the mouse, at the pop-up menu, select ‘Restart client pc’
8.13 Uninstall client pc
In the server system, kindly select the pc unit to be unistalled. Then right-click on the mouse, at the pop-up menu, select ‘Uninstall client pc’
After click confirm, the client pc status will be shown as ‘disconnected’ with a red light indicator, at the same time, a message box prompt will pop up request for confirmation. After click confirm, the pc will then automatically uninstalled.
8,14 User Standby
In the server system, kindly select the pc unit to be put at standby mode. Then right-click on the mouse, at the pop-up menu, select ‘user standby’. The confirmation box will then appear as shown below:
Click ‘(Y)’
If you would like to disable standby, kindly select the pc unit to be put at standby mode. Then right-click on the mouse, at the pop-up menu, select ‘disable user standby’.
8.15 Free open client computer
In the server system, kindly select the pc unit to be open for free. Then right-click on the mouse, at the pop-up menu, select ‘free open client computer’. The confirmation box will then appear as shown below:
Click ‘yes’, then the pop up window will appear as shown below.
Set the time end, then press ‘ok’
8.16 Force shut down
In the server system, kindly select the pc unit to be force shut down. Then right-click on the mouse, at the pop-up menu, select ‘shut down client computer’.
Click ‘yes’ to proceed with force shut down.
8.17 Adjust client’s pc volume
In the server system, kindly select the pc unit to be adjusted on the volume. Then right-click on the mouse, at the pop-up menu, select ‘tune volume client’, then the confirmation box will appear, press ‘yes’ and the window will pop up as shown below:
Adjust the client’s pc volume, then click ‘confirm’.
8.18 Client hardware information
In the server system, kindly select the pc unit that you would like to check on the hardware information. Then, right-click on the mouse. In the dropdown menu, kindly select ‘client hardware inforation’.